Featured

Unit Testing Hibernate Data Access Objects using JUnit 4 – Part I

In this article, I want to show you how to write unit tests for your DAOs. You would preferably use an in-memory db instance like HsqlDb but using a test db is perfectly fine since you’re going to rollback each db transaction. One thing to remember while doing a DAO unit test is that you’d want to test with the db provider that you are going to use in the live, except you will use a test db instance and not the live db instance. The reason for this is that let’s say you are using Hibernate just like I am doing here. You would want to test whether or not the sql queries run against the db using the specific version of hibernate works. Hibernate ships with different versions of driver classes for different db vendors, but for some reason, let’s say the encoding of the db you’re going to use in the live version does not support certain SQL queries generated by Hibernate. If you do an in-memory HSQLDB test and pass you will most likely think that will work with your specific version of db provider. I just don’t think this is accurate enough especially if your queries are complex joins. Again, the rollback feature works for you to take advantage of and regardless of whether you are using an in-memory instance or not, you would still need to populate some data before testing. How else would you test find methods? Another advice I would like to give is to try and use accurate data. I don’t mean real-values of credit cards, but data not like “AAAA” in place of a person’s name. You may run into various issues later when populating your test db with such data. One such problem I can think of is if your entities are annotated with column specifications such as length and type and you have added data that may not be 100% compatible with that. Another problem is relationships between entities.

Moving on we will have these steps:

1. Pre-requisites
2. Setting up the application context
3. Writing Domain and DAO interface
4. Writing DAO unit tests
5. Writing DAO implementations

I will cover 1 and 2 in this part to have the framework in place. In the next part we will write our domain (just one) and dao interface, dao unit test and then dao implementation. This is a logical order because we would want to test first an then see what we need in order for the test to pass. That ‘what we need’ will go into our implementation. This is called, as you might have guessed it, Test Driven Approach.

Pre-requisites

* Spring Core library for dependency injection. We are also going to use SpringJunit4ClassRunner for unit testing.
* Hibernate 3.x. We will be using Hibernate’s Criteria, specifically, Detached Criteria. For more info on using Criteria look here.
* MySQL db.

You can use Maven to configure all of these. Here’s what part of the pom.xml looks like. If you need more help on configuring a maven project please look at my “How to setup a Maven Java Enterprise Application”. You can find that under the category “Deployment”. Here’s the list of artifacts you’ll need:

<dependency>
<groupId>commons-dbcp</groupId>
<artifactId>commons-dbcp</artifactId>
<version>1.2.2</version>
</dependency>
<dependency>
<groupId>org.hibernate</groupId>
<artifactId>hibernate-core</artifactId>
<version>3.3.2.GA</version>
</dependency>
<dependency>
<groupId>org.hibernate</groupId>
<artifactId>hibernate-annotations</artifactId>
<version>3.3.1.GA</version>
</dependency>
<dependency>
<groupId>org.hibernate</groupId>
<artifactId>hibernate-commons-annotations</artifactId>
<version>3.3.0.ga</version>
</dependency>
<dependency>
<groupId>javassist</groupId>
<artifactId>javassist</artifactId>
<version>3.6.0.GA</version>
</dependency>
<dependency>
<groupId>org.slf4j</groupId>
<artifactId>slf4j-jcl</artifactId>
<version>1.5.8</version>
</dependency>
<dependency>
<groupId>mysql</groupId>
<artifactId>mysql-connector-java</artifactId>
<version>5.1.16</version>
</dependency>
<dependency>
<groupId>org.springframework</groupId>
<artifactId>spring-test</artifactId>
<version>${spring.framework.version}</version> <!--version 3.0.5.RELEASE -->
<scope>test</scope>
</dependency>
<dependency>
<groupId>org.springframework</groupId>
<artifactId>spring-context</artifactId>
<version>${spring.framework.version}</version>
</dependency>
<dependency>
<groupId>org.springframework</groupId>
<artifactId>spring-context-support</artifactId>
<version>${spring.framework.version}</version>
</dependency>
<dependency>
<groupId>org.springframework</groupId>
<artifactId>spring-core</artifactId>
<version>${spring.framework.version}</version>
</dependency>
<dependency>
<groupId>org.springframework</groupId>
<artifactId>spring-orm</artifactId>
<version>${spring.framework.version}</version>
</dependency>
<dependency>
<groupId>org.springframework</groupId>
<artifactId>spring-beans</artifactId>
<version>${spring.framework.version}</version>
</dependency>
<dependency>
<groupId>log4j</groupId>
<artifactId>log4j</artifactId>
<version>1.2.14</version>
</dependency>
<dependency>
<groupId>junit</groupId>
<artifactId>junit</artifactId>
<version>4.7</version>
</dependency>

Setting up the Application Context

When the test is run, it will scan the application context to inject the dao interface. The implementation of the dao interface will use Hibernate’s sessionFactory to run our Hibernate queries. We will also add our single Item domain/entity to use sessionFactory. That object will be directly mapped to the ITEM table of our db. I will not create the table since this is simple enough. Lastly, we will need to use Transactions in order to rollback our unit test methods. For this, we will annotate our test methods as @Transactional. Below is the applicationContext.xml.

<?xml version="1.0" encoding="UTF-8"?>
<beans xmlns="http://www.springframework.org/schema/beans" xmlns:xsi="http://www.w3.org/2001/XMLSchema-instance"  xmlns:tx="http://www.springframework.org/schema/tx"     xsi:schemaLocation="http://www.springframework.org/schema/beans http://www.springframework.org/schema/beans/spring-beans-2.5.xsd http://www.springframework.org/schema/tx http://www.springframework.org/schema/tx/spring-tx-3.0.xsd">

<!--  This is where the properties related to datasource are read from -->
<bean id="propertyConfigurer">
<property name="location" value="classpath:hibernate.properties" />
<property name="ignoreUnresolvablePlaceholders" value="false" />
</bean>

<!--  Define dataSource to use -->
<bean id="dataSource">
<property name="driverClassName" value="${hibernate.jdbc.driver}" /> <!-org.gjt.mm.mysql.Driver -->
<property name="url" value="${hibernate.jdbc.url}" />
<property name="username" value="${hibernate.jdbc.user}" />
<property name="password" value="${hibernate.jdbc.password}" />
</bean>

<!--  The sessionFactory will scan the domain objects and their annotated relationships. -->
<bean id="sessionFactory">
<property name="dataSource" ref="dataSource" />
<property name="annotatedClasses">
<list>
<value>com.company.application.core.domain.Item</value>
..............
</list>
</property>
<property name="schemaUpdate" value="true" />
<property name="hibernateProperties">
<props>
<prop key="hibernate.connection.isolation">2</prop>
<prop key="hibernate.bytecode.use_reflection_optimizer">true</prop>
<prop key="hibernate.dialect">org.hibernate.dialect.MySQLDialect</prop>
<prop key="hibernate.jdbc.batch_size">20</prop>
<prop key="hibernate.max_fetch_depth">2</prop>
<prop key="hibernate.show_sql">true</prop>
<prop key="hibernate.format_sql">true</prop>
</props>
</property>
</bean>

<!--  Define Transaction Manager. We will use Hibernate Transaction Manager. -->

<bean id="transactionManager">
<property name="sessionFactory" ref="sessionFactory" />
</bean>
<!--  We will set transactional properties with annotation -->
<tx:annotation-driven />
<bean id="itemDao">
<property name="sessionFactory" ref="sessionFactory" />
</bean>
</beans>

One thing you might have noticed is that I could easily annotated my Dao as @Resource, have it scanned and not defined in the xml above. That is perfectly legal. Now we’re set to write our domain, dao interface, dao test and dao implementation.

Featured

Creating and consuming a EJB 3 Message Driven Bean Part I

“Finally, The Rock has come back to….” More like finally, I am going to write an article (albeit two parts article) about programming, if you don’t regard SQL as programming. In the first part I am going to write about how to send message to a messaging server including creating a new JMS resource. I used glassfish v2.1 for this. You can use do the same on your preferred application server. In the next part I will write about consuming the message via the MDB. So let’s begin. I have created a checklist of functions we need to perform in order deploy our MDB and consume it.

Checklist:

  1. Create a new JMS connection factory to allow creation of JMS objects in the application server. (Messaging server)
  2. Create a new JMS Destination that will be repository for messages sent. (Messaging server)
  3. Use/Create a  session bean to send the message. (Producer Application)
  4. Create our MessageDrivenBean to consume it. (Consumer Application)

Create a new JMS connection factory to allow creation of JMS objects in the application server.
Before we start with creating our MDB and consumer, the first thing I suggest doing is to create a new JMS connection factory in your application server. Think of JMS connection factory as JDBC connection pool. Your JDBC connection pool creates a pool of connection and whenever your application makes a call to get a new connection object, the pool serves it. When you’re done the connection object is returned to the pool and if in active and not invalid state, it can serve another connection request. Using pool is just a lot faster and the application server is responsible for managing it. Of course you are responsible for closing the connection so that it can be returned to the pool. We have the option of using javax.jms.TopicConnectionFactory, javax.jms.QueueConnectionFactory or simply javax.jms.ConnectionFactory. Even though we’re going to be consuming queues (why? I will explain the difference between a topic an queue) staying true to Abstract Factory Pattern, we will use the inteface ConnectionFactory. Have a look at the image below. I’ve created a new JMS Connection Factory with JNDI name jms/InvoiceQueueFactory. I’ve left the Pool Settings to default AS settings.

JMS Connection Factory

Create a new JMS Destination that will be repository for messages sent
Now that you’ve created the Connection Factory we are ready to create a JMS Destination. JMS Destination is where the messages that are sent from the MDB are stored. There are two types of destinations

  • Queue – For point-to-point communication.
  • Topic – For publish-subscribe communication.

What messaging paradigm you want to use is dependent on what your business model is. In the sample MDB, whenever the inventory level of an item in an ABC store reaches below a certain threshold we are going to send an order request  to an XYZ warehouse for the item.

Let’s say an instance of ItemOrder class/entity in the Warehouse client app has the following properties

  • int barcode;
  • int totalItemsToOrder;
  • String companyID;


And an instance of Item class/entity in the ABC producer app has the following fields

  • int barcode;
  • String name;
  • double price;
  • int minQuantity;
  • int totalItemsInStock;


Now what happens is when a shopper buys an item with barcode 3884994 from the shop, the totalItemsInStock drops below the minQuantity. What we want to do now is to send a message to the messaging server so that at a later time (may be 5 secs from now or 2 days from now) the Warehouse Application consumes this and sends an packaging and shipping order to its distribution vendor. What is important here is that one and only one message needs to be sent to warehouse. Otherwise, they’d end up sending more than what you need for your store. We would also like to make the message as durable. But this is a configuration in the MDB itself. Later I will discuss this. Anyways, the point is, we need to send a point-to-point message with specific  item barcode and our company ID (their system requirement, apparently) and make sure that message stays there until it is consumed (Hopefully the message does not expire).

You’d use Publish-subscribe when this is not a requirement. Generally, there is a one to many relationship between publisher and subscriber. This won’t make sense in our scenario here. So Queue it is!

Creating this is easy. Just use another jndi name like I’ve done below and specify the type as Queue.

JMS_Destination_Resource

Use/Create a  session bean to send the message. (Producer Application)
As discussed above, whenever the inventory level drops to below the threshold for that Item, we need to send a message to the Warehouse system via our messaging server to request new orders. What we want to send is our ItemOrder object. I think the valid types are TextMessage, BytesMessage, StreamMessage, ObjectMessage, MapMessage. Please check the API for more info on this. As you may have guessed it, we’re going to use ObjectMessage. The caveat here is that you need to have a similar object in the Warehouse system, or at least one with the properties in ItemOrder object. You get the point.

So without further ado, below is a stateless bean that sends a request to the messaging server when the invoice is saved (saveInvoice), if the inventory level drops below the min threshold.

import com.store.entities.Customer;
import com.store.entities.Invoice;
import com.store.entities.Item;
import java.util.ArrayList;
import java.util.List;
import java.util.logging.Level;
import java.util.logging.Logger;
import javax.annotation.Resource;
import javax.ejb.EJB;
import javax.ejb.Stateless;
import javax.jms.JMSException;
import javax.persistence.EntityManager;
import javax.persistence.PersistenceContext;
import javax.ejb.Remove;
import javax.jms.Connection;
import javax.jms.ConnectionFactory;
import javax.jms.Destination;
import javax.jms.MessageProducer;
import javax.jms.ObjectMessage;
import javax.jms.Session;

@Stateless
public class InvoiceBean implements InvoiceRemote {

    private Invoice invoice = new Invoice();
    @EJB
    private ItemRemote itemService;
    @EJB
    private CustomerRemote customerService;
    @PersistenceContext
    EntityManager em;
    @Resource(name = "jms/InvoiceQueueFactory")
    private ConnectionFactory connectionFactory;
    @Resource(name = "jms/InvoiceQueue")
    private Destination destination;
    private int cartTotal;

    public void addItem(int barcode) {
        Item it = new Item();
        it = (Item) itemService.findItem(barcode);
        if (it.getQuantity() < 1) {
            System.out.println("No item available..........");
        } else {
            it.setQuantity(it.getQuantity() - 1);
            it = (Item) itemService.updateItem(it.getId(), it.getName(), it.getQuantity(), it.getPrice(), it.getBarcode(),
                    it.getMinQuantity(), it.getImage(), it.getItemsToOrder(), it.getShippingCost());
            if(getInvoice().getItems()==null){
                List<Item> items = new ArrayList<Item>();
                items.add(it);
                getInvoice().setItems(items);
                this.setCartTotal(1);
            }else{
                getInvoice().getItems().add(it);
                this.setCartTotal(this.getCartTotal()+1);
            }
            getInvoice().setTotalCost(it.getPrice()+getInvoice().getTotalCost());
        }

    }

    public void removeItem(int barcode) {
        Item it = itemService.findItem(barcode);
        it.setQuantity(it.getQuantity() + 1);
        itemService.updateItem(it.getId(), it.getName(), it.getQuantity(), it.getPrice(), it.getBarcode(),
                it.getMinQuantity(), it.getImage(), it.getItemsToOrder(), it.getShippingCost());
        getInvoice().getItems().remove(it);
        getInvoice().setTotalCost(getInvoice().getTotalCost()- it.getPrice());
        this.setCartTotal(this.getCartTotal()-1);
    }

    @Remove
    public void saveInvoice() {
        em.persist(getInvoice());
        for (Item i : getInvoice().getItems()) {
            Item it = new Item();
            it = itemService.findItem(i.getBarcode());
            if (it.getQuantity() <= it.getMinQuantity()) {

                try {
                    Connection connection = connectionFactory.createConnection();
                    Session session = connection.createSession(true,
                            Session.AUTO_ACKNOWLEDGE);
                    MessageProducer producer = session.createProducer(destination);
                    ObjectMessage message = session.createObjectMessage();
                    ArrayList list = new ArrayList();
                    list.add(it.getBarcode());
                    list.add(it.getItemsToOrder());
                    message.setObject(list);
                    producer.send(message);
                    session.close();
                    connection.close();
                } catch (JMSException ex) {
                    Logger.getLogger(InvoiceBean.class.getName()).log(Level.SEVERE, null, ex);
                }
            }
        }
    }

    @Remove
    public void cancelInvoice() {
        this.setCartTotal(0);
        for (Item i : getInvoice().getItems()) {
            Item it = itemService.findItem(i.getBarcode());
            it.setQuantity(it.getQuantity() + 1);
            itemService.updateItem(it.getId(), it.getName(), it.getQuantity(), it.getPrice(),
                    it.getBarcode(), it.getMinQuantity(), it.getImage(), it.getItemsToOrder(), it.getShippingCost());
        }
        setInvoice(new Invoice());
        setCartTotal(0);
    }

    public void addCustomer(int customerID) {

        Customer cust = new Customer();
        cust = (Customer) customerService.findCustomer(customerID);
        System.out.println(cust.getEmail());
        getInvoice().setCustomer(cust);
    }

    /**
     * @return the invoice
     */
    public Invoice getInvoice() {
        return invoice;
    }

    /**
     * @param invoice the invoice to set
     */
    public void setInvoice(Invoice invoice) {
        this.invoice = invoice;
    }

    /**
     * @return the cartTotal
     */
    public int getCartTotal() {
        return cartTotal;
    }

    /**
     * @param cartTotal the cartTotal to set
     */
    public void setCartTotal(int cartTotal) {
        this.cartTotal = cartTotal;
    }
}

As you can see the stateless bean performs its other business methods and when it finally (@Remove to remove its instance and return it to the pool of stateless beans)  savesInvoice, it sends a message to the messaging server, only if the inventory level drops below the minQuantity.

So this takes care of part I. In Part II I will write the Warehouse’s MDB.


Featured

SQL Profiler and Database Tuning Advisor and optimizing the db server

About a year and half ago, I’d done some work on tuning my production database. The db was SQL server 2005 but what I will write below should work for SQL server 2k8 as well.

My notes on using SQL Profiler and Database tuning advisor(err..tips if you will):

  • Common columns to use are TextData, Duration, CPU, Reads, Writes, ApplicationName, StartTime and EndTime.
  • Do not trace to table. If you want in a table, import it.
  • Right-click on column to apply filter starting with that column.
  • Not all events within a group are important.
  • EventClass and SPID columns cannot be unselected. EventClass cannot be selected either.
  • Do not use on the PC where the database resides. Use Profiler from a different PC.
  • If your sever is busy do not check server processes trace data.
  • Turn Auto Scroll off to monitor a previous event without being scrolled to the bottom.
  • Bookmarking is useful to identify which even to look at a later time.
  • In order to minimize the load on the SQL server, reduce the number of events traced/captured.
  • The same goes with data columns.
  • Useful events to track slow running stored procedures are RPC:Completed, SP:StmtCompleted, SQL:BatchStarting, SQL:BatchCompleted and ShowPlan XML.
  • Useful data columns are Duration, ObjectName, TextData, CPU, Reads, Writes, IntegerData, DatabaseName, ApplicationName, StartTime, EndTime, SPID, LoginName, EventSequence, BinaryData.

Testing for which queries run frequently and storing that to trace table. This should be found out from the production server.

SELECT [ObjectName], COUNT(*) AS [SP Count]
 FROM [dbo].[Identify_query_counts]
 WHERE [Duration] > 100
 AND [ObjectName] IS NOT NULL
 GROUP BY [ObjectName]
 ORDER BY [SP Count] DESC
  • Testing for deadlocks use events like Deadlock graph, Lock: Deadlock, Lock: Deadlock Chain, RPC: Completed, SP: StmtCompleted, SQL: BatchCompleted, SQL: BatchStarting.
  • Useful data columns are TextData, EventSequence, DatabaseName.
  • Testing for blocking issues use event BlockedProcessReport but also use this:
    SP_CONFIGURE 'show advanced options', 1 ;
    GO
    RECONFIGURE ;
    GO
    SP_CONFIGURE 'blocked process threshold', 10 ;
    GO
    RECONFIGURE ;
    GO//do this to turn it off
    SP_CONFIGURE 'blocked process threshold', 0 ;
    GO
    RECONFIGURE ;
    GO
  • Useful Data Columns are Events, TextData, Duration, IndexID, Mode, DatabaseID, EndTime
  • For production environment set the value of threshold to 1800 (30 mins) and be sure to turn off.
  • Testing for excessive index/table scans, use events like Scam:Started along with RPC:Completed, SP:StmtCompleted, SQL:BatchStarting, SQL:BatchCompleted and Showplan XML.
  • Useful Data columns are ObjectID, ObjectName, Duration, EventCall, TextData, CPU, Reads, Writes, IntegerData, StartTime, EndTime, EventSequence and BinaryData.
  • DTA: Provide representative workload in order to receive optimal recommendations.
  • Only RPC:Completed, SP:StmtCompleted and SQL:BatchCompleted.
  • Data Columns used are TextData, Duration, SPID, DatabaseName and LoginName.
  • Check Server Processes Trace Data to capture all trace events.
  • Run traces quarterly or monthly to feed to DTA to ensure indexes are up to date.
  • Create baseline traces to compare traces after indexing to check which queries run most often and their average duration.
  • Run only one trace at a time.
  • Do not run Profiler when running DB backup.
  • Set the Trace Off time when you run trace.
  • Run DTA at low traffic times.
  • Reduce the use of cursors in the application. Those that are in jobs or not in use can be ignored if they execute on time and on those hours where the application is least accessed.
  • Index created without the knowledge of queries serve little purpose.
  • Sort the trace (tuning) by CPU Reads. This gives the costly query.

Basically there are different parameters to look at. Firstly, I optimized those queries that are most frequently used by creating indexes and where possible re-writing them looking at query execution path. Then since I know these indexes are going to be fragmented when data gets updated or deleted from the tables in question, I setup a defragmentation plan as a job in the db server. Those indices that had fragmentation between 0 and 20 were left untouched, between 20 and 40 were re-organized and those above 40 were re-built.

Secondly, I also examined any queries or stored procedures that were hogging CPU, meaning not responding and causing other queries to wait for it to complete. There was one that I found that was not written very well. So I re-wrote it.

After that, I checked other server parameter to see if the server actually meets the standard. Such parameters are ‘Memory -> pages/sec’ and ‘Memory->Available bytes’.  We had 32-bit processor so we couldn’t upgrade the RAM only. We had to upgrade it to 64-bit server with initially 8gb RAM enabling 3GB of process space. The reason for upgrade to only 8gb was of course we want to see gradual performance improvement.

Then, I adjusted connection pooling parameters of my application server (Jboss 4.0.3 sp1) by doing a lot of load testing. I think I should have an article on that later. It was setup with Apache forwarding all the non-static (images and html) requests to Jboss. I won’t dwell on this too much for now.

Lastly, all the developers in team focuses their attention to checking the source code to see if connections were being opened and closed properly. The application was using JDBC and this was quite a tedious task. We’d even managed to write code to flush connection after it reached a certain inactive threshold and log whenever it did that. I know most dba’s would ask to do this step first, but either way our queries and db server needed optimization/upgrade.

There was an emailing app which sent newsletters to over 150k users at the time. It used to execute normally from 5-6hrs depending on the traffic on the application. That drastically dropped to less than an hour! 🙂

References:

Query to get the top 20 most executed queries in the database

SELECT TOP 20 SUBSTRING(qt.text, (qs.statement_start_offset/2)+1,
((CASE qs.statement_end_offset WHEN -1 THEN DATALENGTH(qt.text) ELSE
qs.statement_end_offset
END - qs.statement_start_offset)/2)+1), qs.execution_count, qs.total_logical_reads,
qs.last_logical_reads,
qs.min_logical_reads, qs.max_logical_reads, qs.total_elapsed_time, qs.last_elapsed_time,
qs.min_elapsed_time, qs.max_elapsed_time, qs.last_execution_time, qp.query_plan
FROM sys.dm_exec_query_stats qs
CROSS APPLY sys.dm_exec_sql_text(qs.sql_handle) qt
CROSS APPLY sys.dm_exec_query_plan(qs.plan_handle) qp
WHERE qt.encrypted=0
ORDER BY qs.total_logical_reads DESC

Query to identify wait times

Select top 10 *
from sys.dm_os_wait_stats
ORDER BY wait_time_ms DESC

The job to set defragmentation logic
USE [xxxx]--Your Db name
GO
SET ANSI_NULLS ON GO SET QUOTED_IDENTIFIER ON GO


ALTER PROCEDURE [dbo].[sp_IndexDefrag] AS DECLARE @DBName NVARCHAR(255),         @TableName NVARCHAR(255),         @SchemaName NVARCHAR(255),         @IndexName NVARCHAR(255),         @PctFrag DECIMAL,         @Defrag NVARCHAR(MAX)

IF EXISTS (SELECT * FROM sys.objects WHERE object_id =  object_id(N'#Frag'))     DROP TABLE #Frag
Create table #Frag         (DBName NVARCHAR(255),          TableName NVARCHAR(255),          SchemaName NVARCHAR(255),          IndexName NVARCHAR(255),          AvgFragment DECIMAL)


EXEC sp_msforeachdb 'INSERT INTO #Frag(DBName,                                        TableName,                                        SchemaName,                                        IndexName,                                        AvgFragment)
                     Select ''?'' As DBNAME,                             t.Name As TableName,                            sc.Name As SchemaName,                             i.name As IndexName,                             s.avg_fragmentation_in_percent                      FROM 
?.sys.dm_db_index_physical_stats(DB_ID(''?''),NULL,NULL,NULL,''Sampled'') As s                      JOIN ?.sys.indexes i                      ON s.Object_Id = i.Object_id                         AND s.Index_id = i.Index_id                      JOIN ?.sys.tables t                      ON i.Object_id = t.Object_id                      JOIN ?.sys.schemas sc                      ON t.schema_id = sc.SCHEMA_ID                      WHERE s.avg_fragmentation_in_percent > 20                      AND t.TYPE = ''U''                      AND s.page_count > 8                       ORDER BY TableName, IndexName'

                    DECLARE cList CURSOR FOR                      SELECT * FROM #Frag                      where DBName = 'XXXX' --your db
                    OPEN cList                      FETCH NEXT FROM cList                      INTO @DBName, @TableName, @SchemaName, @IndexName, @PctFrag


                    WHILE @@FETCH_STATUS = 0                      BEGIN                           IF @PctFrag BETWEEN 20.0 AND 40.0                           BEGIN                                SET @Defrag = N'ALTER INDEX ' + @IndexName + ' ON ' + 
@DBName + '.' + @SchemaName + '.' + @TableName + ' REORGANIZE'                                EXEC sp_executesql @Defrag                                PRINT 'Reorganize index: ' + @DBName + '.' + @SchemaName + '.' + @TableName + '.' + @IndexName
                          END                           ELSE IF @PctFrag > 40.0
                          BEGIN                                SET @Defrag = N'ALTER INDEX ' + @IndexName + ' ON ' + @DBName + '.' + @SchemaName + '.' + @TableName + ' REBUILD'
                               EXEC sp_executesql @Defrag                                PRINT 'Rebuild index: ' + @DBName + '.' + @SchemaName + '.' + @TableName + '.' + @IndexName
                          END
                         FETCH NEXT FROM cList                           INTO @DBName, @TableName, @SchemaName, @IndexName, @PctFrag                     END                     CLOSE cList                     DEALLOCATE cList

                    DROP TABLE #Frag

So that’s it. ‘;) I know this is very long for a post, but trust me, your work takes days if not weeks. And optimization is an on-going process. You cannot sit back and relax once you do it the first time.

Featured

Setting Up Maven Enterprise Application Part I

Part I: Setting up maven and overall structure


This will be the first of 2 part series where I would like to show how to quickly setup a Java Enterprise Application. In this part you will setup the overall project structure, configure your libraries, build path and module dependencies. I use RAD/Eclipse with m2Eclipse plugin which you can find here for development but the configuration is independent of what IDE or text editor you choose to use. So let’s get started.

Pre-requisites:

  • Maven 2. I used maven version 2.0.9. For a higher version of maven, please refer to maven documentation.
  • Eclipse/RAD. Although you can do this without an IDE, it will nonetheless be easier to configure in an IDE since this is an Enterprise Application.
  • JDK 1.4 or higher. I prefer JDK 5 or higher.

Overall structure
The enterprise application that I am going to setup will have a JAR module for services and DAOs, a WAR module that will import the JAR module and an EAR module that will include the WAR module. If you wish to add more modules, you can choose similar structure. You could have only WAR and JAR modules in eclipse, but it is preferable to house them within an EAR. Also RAD requires you to have a deployable EAR. Our WAR module will be deployed. To make this a maven project will have also have a parent-pom (which is not a module) sit above all three modules above that will package them together.

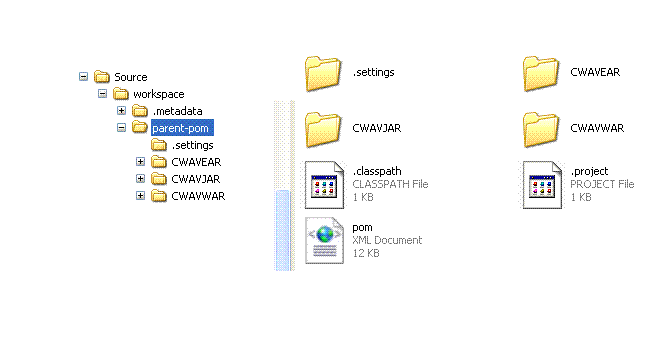
Look at the structure below to see how the structure will look like:
Overall Structure

Setting individual modules starting with parent-pom
When you look at the image above, you will see three files: pom.xml, .project, .classpath. All three are important to configure. The IDE will generate your .classpath and .project files but I will nevertheless go through all of them to ensure that you understand what the IDE is generating. Also you can the .settings folder. This folder is specifically related to parent-pom. This folder will contain additional project/IDE related configurations. But I will not go through this because I don’t want to make this too long. Also, the configuration for individual modules will be similar to what you will do for parent-pom. If you understand how I am going to configure these three files, you will easily be able to configure the rest.
So let’s begin with pom.xml. Pom files are read by maven in order to do the following:

  • Package modules. In this parent pom, you will package all three modules. The package name will be their folder names. In the EAR’s pom, you would add the WAR module and in the WAR the JAR module. The JAR module will not have any module dependency.
  • Define versioning, application description, url, name and so on. This is self explanatory. However, you’d want version to be consistent across all modules.
  • Dependencies. You will define all the artifacts and their version that you’d use in your application. In this parent pom, you’d define all artifacts that are common to more than one module. For e.g you’d define log4j here since you’d need logging in both the JAR and WAR module. Same can be said of JUnit and Spring core libraries.
  • Developers and Contributors. Optional. List out the developers/contributors and their roles.
  • Plugin Lists. This lets you define your goals for you build process. For example, you’d use cobertura to see what percentage of your source code is unit tested.
  • Reporting List. Optional. If your need is to generate reports, you’d use this. Again, as I mentioned you’d want to get cobertura report, here’s where you define cobertura-maven-plugin.
  • Repositories. A repository is where you’d pull all the artifacts from. Some private repos need authentication, but most don’t. While your default settings.xml of maven is a good place to define your repositories, this is also another place to do so.

Please look at the code below for more info:

<?xml version="1.0" encoding="UTF-8" standalone="no"?>
<project xmlns="http://maven.apache.org/POM/4.0.0"
xmlns:xsi="http://www.w3.org/2001/XMLSchema-instance"
xsi:schemaLocation="http://maven.apache.org/POM/4.0.0 http://maven.apache.org/maven-v4_0_0.xsd">
<!--
This is the 'parent' POM (Project Object Model) which will have the following
nodes inherited by any POM which declared the <parent/> node to point to this
POM. Please note: This is not the 'super POM' which is supplied by Maven itself.
The super POM has its values inherited by all POMs.

* dependencies
* developers and contributors
* plugin lists
* reports lists
* plugin executions with matching ids
* plugin configuration

@author yourName
@version 1.0
-->

<!--
The POM version.
-->
<modelVersion>4.0.0</modelVersion>

<!--
The organization that is creating the artifact. The standard naming convention
is usually the organizations domain name backwards like the package name in Java.
-->
<groupId>com.yourCompanyName.ApplicationName</groupId>

<!--
The artifact name. This will be used when generating the phsyical artifact name.
The result will be artifactId-version.type.
-->
<artifactId>parent-pom</artifactId>

<!--
The type of artifact that will be generated. In this case no real artifact is
generated by this POM, only the sub projects.
-->
<packaging>pom</packaging>

<!--
The version of the artifact to be generated.
-->
<version>0.0.1-SNAPSHOT</version>

<!--
The name of the project to be displayed on the website.
-->
<name>Your Application Name</name>

<!--
The description of the project to be displayed on the website.
-->
<description>
Description of your app
</description>

<!--
The url of the project to be displayed on the website.
-->
<url>http://www.WARModuleURL.com</url>
<!--
This project is an aggregation/multi-module which includes the following
projects. Please note: the value between the module node is the folder
name of the module and not the artifactId value.
-->
<modules>
<module>AppNameJAR</module>
<module>AppNameWAR</module>
<module>AppNameEAR</module>
</modules>

<!--
This segement list the inherited dependencies for each child POM.
-->
<dependencies>
<dependency>
<groupId>org.mockito</groupId>
<artifactId>mockito-core</artifactId>
<version>1.8.5</version>
<scope>test</scope>
</dependency>
<dependency>
<groupId>junit</groupId>
<artifactId>junit</artifactId>
<version>4.4</version>
<scope>test</scope>
</dependency>
......
</dependencies>

<!--
The following node defines the developers that are working on the project,
their roles and contact information. This will be used when the site is
generated for the project. (mvn site).

* id - The id of the developer.
* name - The display name that will be used for the display name under 'Project Team' of the website.
* email - The e-mail address of the team member which will be displayed.
* roles - A list of roles the member fulfills.
* organization - The organization of the developer.
* timezone - The timezone of the developer.
-->
<developers>
<developer>
<id>12344</id>
<name>Your Name</name>
<email>yourEamil</email>
<organization>
ABC company INC
</organization>
<organizationUrl>http://www.ABC_Comapnycom</organizationUrl>
<roles>
<role>Technical Leader</role>
</roles>
<timezone>+5:45</timezone>
</developer>
</developers>

<!--
The following node defines the contributors that are working on the project,
their roles and contact information. This will be used when the site is
generated for the project. (mvn site).

* name - The display name that will be used for the display name under 'Project Team' of the website.
* email - The e-mail address of the team member which will be displayed.
* roles - A list of roles the member fulfills.
* organization - The organization of the developer.
* timezone - The timezone of the developer.
-->
<contributors>
<contributor>
<name>SomeName</name>
<email>SomeEmail</email>
<organization>
ABC company INC
</organization>
<organizationUrl>http://www.ABC_Comapnycom</organizationUrl>
<roles>
<role>Engineering Manager</role>
</roles>
<timezone>+5:45</timezone>
</contributor>
...
</contributors>
<!--
Each POM file is a configuration file for the build process. There are many plug-ins
for adding new steps in the build process and controlling which JDK is being used.
Below we customize the version of the JDK as well as some code inspection tools like:

1. Cobertura
-->
<build>
<plugins>
<!--
Configure the maven-compiler-plugin to use JDK 1.5
-->
<plugin>
<groupId>org.apache.maven.plugins</groupId>
<artifactId>maven-compiler-plugin</artifactId>
<configuration>
<source>1.5</source>
<target>1.5</target>
<fork>true</fork>
</configuration>
</plugin>
<!--
Configure Cobertura to ignore monitoring the apache log4j
class.
-->
<plugin>
<groupId>org.codehaus.mojo</groupId>
<artifactId>cobertura-maven-plugin</artifactId>
<version>2.0</version>
<configuration>
<instrumentation>
<ignores>
<ignore>org.apache.log4j.*</ignore>
</ignores>
</instrumentation>
</configuration>

<!--
The following controls under which goals should this
plug-in be executed.
-->
<executions>
<execution>
<goals>
<goal>clean</goal>
<goal>cobertura</goal>
</goals>
</execution>
</executions>
</plugin>

<plugin>
<groupId>org.codehaus.mojo</groupId>
<artifactId>findbugs-maven-plugin</artifactId>
<version>2.0.1</version>
<configuration>
<findbugsXmlOutput>true</findbugsXmlOutput>
<includeTests>false</includeTests>
<skip>true</skip>
</configuration>

</plugin>

<plugin>
<groupId>org.apache.maven.plugins</groupId>
<artifactId>maven-assembly-plugin</artifactId>
<configuration>
<descriptors>
<descriptor>assembly.xml</descriptor>
</descriptors>
</configuration>
</plugin>

</plugins>
</build>

<!--
Maven can look at various repositories to locate dependencies that
need to be downloaded and placed into the local repository. In the
below configuration, we enable codehaus, apache, and opensymphony
repositories.
-->
<repositories>
<repository>
<id>snapshots-maven-codehaus</id>
<name>snapshots-maven-codehaus</name>
<snapshots>
<enabled>true</enabled>
<updatePolicy>always</updatePolicy>
<checksumPolicy>ignore</checksumPolicy>
</snapshots>
<releases>
<enabled>false</enabled>
</releases>
<url>http://snapshots.maven.codehaus.org/maven2</url>
</repository>
<repository>
<id>Maven Snapshots</id>
<url>http://snapshots.maven.codehaus.org/maven2/</url>
<snapshots>
<enabled>true</enabled>
</snapshots>
<releases>
<enabled>false</enabled>
</releases>
</repository>
<repository>
<id>spring-s3</id>
<name>Spring Portfolio Maven MILESTONE Repository</name>
<url>
http://s3.amazonaws.com/maven.springframework.org/milestone
</url>
</repository>
...
</repositories>

<!--
For the reporting area of the website generated.

1. JavaDoc's
2. SureFire
3. Clover
4. Cobertura
5. JDepend
6. FindBugs
7. TagList

-->
<reporting>
<plugins>
<plugin>
<artifactId>maven-javadoc-plugin</artifactId>
<configuration>
<reportOutputDirectory>${site-deploy-location}</reportOutputDirectory>
<destDir>${project.name}</destDir>
<aggregate>true</aggregate>
</configuration>
</plugin>
<plugin>
<groupId>org.codehaus.mojo</groupId>
<artifactId>jxr-maven-plugin</artifactId>
</plugin>
<plugin>
<groupId>org.codehaus.mojo</groupId>
<artifactId>surefire-report-maven-plugin</artifactId>
</plugin>
<plugin>
<artifactId>maven-clover-plugin</artifactId>
</plugin>
<plugin>
<groupId>org.codehaus.mojo</groupId>
<artifactId>cobertura-maven-plugin</artifactId>
</plugin>
<plugin>
<groupId>org.codehaus.mojo</groupId>
<artifactId>jdepend-maven-plugin</artifactId>
</plugin>
<plugin>
<groupId>org.codehaus.mojo</groupId>
<artifactId>findbugs-maven-plugin</artifactId>
<version>1.0.0</version>
<configuration>
<threshold>Normal</threshold>
<effort>Default</effort>
</configuration>
</plugin>
<plugin>
<groupId>org.codehaus.mojo</groupId>
<artifactId>taglist-maven-plugin</artifactId>
<configuration>
<tags>
<tag>TODO</tag>
<tag>FIXME</tag>
<tag>@todo</tag>
<tag>@deprecated</tag>
</tags>
</configuration>
</plugin>
</plugins>
</reporting>

</project>
Now that this is taken care of let’s look into .project and .classpath quickly. The .project basically specifies build Commands. We will use eclipse’s javaBuilder and maven2Builder. Look below.

<?xml version="1.0" encoding="UTF-8"?>
<projectDescription>
<name>parent-pom</name>
<comment></comment>
<projects>
</projects>
<buildSpec>
<buildCommand>
<name>org.eclipse.jdt.core.javabuilder</name>
<arguments>
</arguments>
</buildCommand>
<buildCommand>
<name>org.maven.ide.eclipse.maven2Builder</name>
<arguments>
</arguments>
</buildCommand>
</buildSpec>
<natures>
<nature>org.eclipse.jdt.core.javanature</nature>
<nature>org.maven.ide.eclipse.maven2Nature</nature>
</natures>
</projectDescription>

.classpath is where you’d define where you want the built packages to reside, your maven repository location, what your source files are and the path to them are. Here’s one from the WAR module.

<?xml version="1.0" encoding="UTF-8"?>
<classpath>
<classpathentry kind="src" output="target/classes" path="src/main/java"/>
<classpathentry kind="src" output="target/classes" path="src/main/resources"/>
<classpathentry kind="src" output="target/test-classes" path="src/test/java"/>
<classpathentry kind="src" output="target/test-classes" path="src/test/resources"/>
<classpathentry kind="con" path="org.eclipse.jdt.launching.JRE_CONTAINER/org.eclipse.jdt.internal.debug.ui.launcher.StandardVMType/J2SE-1.5"/>
<classpathentry kind="con" path="org.eclipse.jst.j2ee.internal.web.container"/>
<classpathentry exported="true" kind="con" path="org.eclipse.jst.j2ee.internal.module.container"/>
<classpathentry kind="con" path="org.eclipse.jst.server.core.container/com.ibm.ws.ast.st.runtime.runtimeTarget.v61/was.base.v61"/>
<classpathentry kind="con" path="org.maven.ide.eclipse.MAVEN2_CLASSPATH_CONTAINER"/>
<classpathentry kind="output" path="target/classes"/>
</classpath>

At this stage you have setup the overall project structure, configured your libraries, build path and module dependencies. You are now ready to build individual modules starting with your JAR, then WAR and finally adding them to EAR. You basically add JAR to WAR and only add WAR to EAR. You don’t want cycilc dependency. I will show this in part II.

Featured

How to: Configure SMTP mail server in Windows Server 2008 and IIS 6.0

Some time back, I had a problem with exporting huge amount of data as csv to view in excel from a production server. It took several minutes when the server load was normal and far worse when it experienced peak traffic. My client asked me if I could take this feature off of the live server and then automate this process so that he would receive the exported data in the mail instead of requesting data from me. This meant three things, creating a sql job that executed once a week which executed an export script using ‘bcp’ feature to a file which would then be sent as an attachment to the client. I will explain how to configure SMPT mail server and send email as a two part series.

This is the first of the two part series where I would like to show how to configure SMTP mail server in Windows Server 2008.

  • From the Start Menu, navigate to “Administrative Tools” and select “Server Manager”.
  • From the “Features Summary” click on “Add Features”.
  • Select “SMTP Server” and click on Install. Accept all changes.
  • Now from “Administrative Toos” , select “Internet Information Services (IIS) 6.0 Manager”.
  • Right click on “SMTP Virtual Severs” and click on properties.
  • Navigate to “Access” tab and click on “Relay” button.
  • Leave the “Only the list below” radio button clicked and click on “Add” button.
  • Leave the “Single computer” option selecte and enter 127.0.0.1 as your IP address.
  • Now click apply and you are almost done.
  • Right click on “SMTP Virtual Severs” and click on start.

This is it. Now you have SMPT server configured and running!! Follow the next part in this two part series to send mail via SQL Server 2008 Enterprise Edition.

C# Using Moq to mock out parameters on a void method

It has been a long time since I posted any article on my blog. Today presented an interesting scenario where I wanted to mock out a void method that accepted out parameters. The void method does not explicitly return anything but implicitly modify the parameters so there has to be a callback method attached.

Normally, with return methods you’d do something like:

mockObject.Setup(x => x.GetSomething(It.IsAny<string>)).Returns("Whatever");

But with a void method, we do not return anything but still don’t want a NullReferenceException to be thrown. So we do something like:

mockObject.Setup(x => x.DoVoid(It.IsAny<object>)).Verifiable();

Please note that I am passing parameters in both methods above just to build up to the actual problem at hand.

So what if we want to pass out parameter? Can we do something like

It.IsAny<List<Person>>()?

Nope. Ref and out parameters need to be initialized. That takes care of part of the problem.

var myList = new List<Person>();

//Arrange
mockObject.Setup(x => x.GetAllIdiots(out myList)).Returns(null);

Now, what if we have a void method and want to modify something within the method. After all, that’s why we use the out and ref parameters.

So we add a callback method. Here’s how to do it:

//initialize the out object
var myList = new List<Person>();

//Arrange
mockObject.Setup(x => x.DoVoid(out myList))
.Callback<(List<Person>)>((person) =>
{

//feel free to do whatever here..
});

There you go. Simple. Easy. The variable within the callback can be named anything.

Adoption of Agile and Atlassian

Over the past two or three years we have seen companies moving towards adopting Scrum or other variations of agile development. I think the main reasons for this has been to give clients more control over the software that is being developed while having the ability to look at the competitors and apply the changes as seen necessary. This is even truer for products that take more than 6 months from conception to delivery.

Back in late 90s – before the dot com bubble burst – anyone who could write simple HTML could quickly write web pages and in the short term hope to make a lot of money. People did not care about the quality of their products as long as they had it out there. But after that bubble burst, with more and more companies failing, companies started to take software development more seriously. One of the things that came out, although it present decades ago, was adoption of rigid waterfall methodology in software development.

Although, waterfall methodology has its own strengths in documentation, strict scheduling and planning and fixed budget, these last two strengths ultimately becomes its weakness as the complexities of projects grow. This problem increases even more so for lengthier projects. With agile on the other hand, while the problems do not just go away, they’re at the very least addressed. For example, instead of defining all the functions today for a product to be delivered 18 months down the road, we will only look at what can be done within the next sprint. It does not mean that the goal of the project is not understood or unimportant. It just means we’re not cramming our developers, architects, project managers and product owners today with what isn’t possible to do. Instead we want to deliver the client the most important part of the project early so if unforeseen changes are necessary, we can do it early. Changes later in the lifecycle of traditional methodologies mean lots of man hours.

Now how agile fits into Atlassian’s  products is summed up by two words – “Continuous Integration”. Back in 2010 when I worked on project called Project Management Office Dashboard, I was working on integrating JIRA with the PMO Dashboard with the help of Greenhopper’s remote API. We were using Scrum and we needed to be able to streamline JIRA and PMO so that users could access JIRA from within PMO dashboard. While we were working on this, the other tools came in handy such as Crucible for code review. Code review is one of best practices of agile. If we’re writing code and checking in every couple hours with the help of Bamboo (another Atlassian tool) build server, we sure want the code to be reviewed as frequently even if the builds are successful.

So in brief, adoption of agile and using Atlassian tools go hand-in-hand. In the coming years, I am sure there will be some form of agile development and at least a handful of Atlassian set of tools used by most IT companies all over the globe.

Hibernate connection issue with CentOS, MySQL & Tomcat 7

If you are working on CentOS and MySQL, you will want to make sure you verify your connection after the application has been left untouched for some time. Without trying to verify connection you’ll end up with a stack trace complaining “Could not open Hibernate Session…”. Surprisingly this does not happen on Windows with the same configuration. I am using commons-dbcp.jar and commons-pool.jar. Here is my configuration –

<!--  Define dataSource to use -->
<bean id="dataSource" class="org.apache.commons.dbcp.BasicDataSource">
<property name="driverClassName" value="${hibernate.jdbc.driver}" />
<property name="url" value="${hibernate.jdbc.url}" />
<property name="username" value="${hibernate.jdbc.user}" />
<property name="password" value="${hibernate.jdbc.password}" />
</bean>

<!--  The sessionFactory will scan the domain objects and their annotated relationships. -->
<bean id="sessionFactory" class="org.springframework.orm.hibernate3.annotation.AnnotationSessionFactoryBean">
<property name="dataSource" ref="dataSource" />
<!--  Packages to scan probably works but I will use xml definitions -->
<!--
<property name="packagesToScan">
<list>
<value="com.d2.tej.domain" />
<value="com.d2.tej.dao.impl" />
<value="com.d2.tej.service.impl" />
</list>
</property>
-->
<property name="annotatedClasses">
<list>
<value>com.OrthoPatientDirect.OPDJAR.core.domain.AdminUser</value>
<value>com.OrthoPatientDirect.OPDJAR.core.domain.AdminLogin</value>
<value>com.OrthoPatientDirect.OPDJAR.core.domain.Code</value>
<value>com.OrthoPatientDirect.OPDJAR.core.domain.Patient</value>
<value>com.OrthoPatientDirect.OPDJAR.core.domain.PatientDetail</value>
<value>com.OrthoPatientDirect.OPDJAR.core.domain.PodType</value>
<value>com.OrthoPatientDirect.OPDJAR.core.domain.PodTypeContent</value>
<value>com.OrthoPatientDirect.OPDJAR.core.domain.Practice</value>
<value>com.OrthoPatientDirect.OPDJAR.core.domain.Procedure</value>
<value>com.OrthoPatientDirect.OPDJAR.core.domain.Surgeon</value>
<value>com.OrthoPatientDirect.OPDJAR.core.domain.Subscription</value>
</list>
</property>
<property name="schemaUpdate" value="true" />
<property name="hibernateProperties">
<props>
<prop key="hibernate.connection.isolation">2</prop>
<prop key="hibernate.bytecode.use_reflection_optimizer">true</prop>
<!-- <prop key="hibernate.dialect">org.hibernate.dialect.SQLServerDialect</prop>-->
<prop key="hibernate.dialect">org.hibernate.dialect.MySQLInnoDBDialect</prop>
<!-- org.hibernate.dialect.MySQLMyISAMDialect, org.hibernate.dialect.MySQLDialect, org.hibernate.dialect.MySQLInnoDBDialect -->
<prop key="hibernate.jdbc.batch_size">10</prop>
<prop key="hibernate.max_fetch_depth">2</prop>
<prop key="hibernate.show_sql">true</prop>
<prop key="hibernate.format_sql">true</prop>
<prop key="hibernate.hbm2ddl.auto">update</prop>
<!--connection pool-->
<prop key="hibernate.dbcp.maxActive">10</prop>
<prop key="hibernate.dbcp.whenExhaustedAction">1</prop>
<prop key="hibernate.dbcp.maxWait">20000</prop>
<prop key="hibernate.dbcp.maxIdle">10</prop>

<!-- prepared statement cache-->
<prop key="hibernate.dbcp.ps.maxActive">10</prop>
<prop key="hibernate.dbcp.ps.whenExhaustedAction">1</prop>
<prop key="hibernate.dbcp.ps.maxWait">20000</prop>
<prop key="hibernate.dbcp.ps.maxIdle">10</prop>

<!-- optional query to validate pooled connections:-->
<prop key="hibernate.dbcp.validationQuery">select 1</prop>
<prop key="hibernate.dbcp.testOnBorrow">true</prop>
<prop key="hibernate.dbcp.testOnReturn">true</prop>

</props>
</property>
<!--If you want to configure any listeners for any event this is the place to do.  -->
<!--
<property name="eventListeners">
<map>
<entry key="delete">
<bean class="com.tej.core.hibernate.listener.DeleteEventListener" />
</entry>
</map>
</property>
-->
</bean>

5 Steps to Improve Your Java App’s Performance with New Relic

Overview

The New Relic is a must-have tool when it comes to tuning and monitoring your java web application. The plugin is trivial to install on your application server and once your application is deployed and your app server restarted to take effect, you will quickly have access to a very informative dashboard (see Figure 1). Although the New Relic allows you to monitor different stacks – Servers, Applications, Transactions and Real-time user experience monitoring, while all the stacks are equally important, we’ll be focusing on the Application stack. I will also briefly explain the Transactions stack as this is a new feature that fits well for our tuning purpose.

Application Stack – Dashboard view

The Applications stack in the dashboard displays the applications that are deployed. On the right hand side recent events are displayed. These are important as they list out Alert notifications which are based on customizable parameters, Apdex score which is based on application’s throughput and is also customizable, Critical problems such as Error rate, Downtime and any recent activities performed on the dashboard such as updating application settings. Clicking on any of these notifications will allow you to drill down to view detailed, graphical reports. We should now click on the application name (OPD) in order to set performance monitoring parameters and analyze them.

Dashboard

Figure 1: Dashboard View of Sample Web Application – OPD

Tuning the Application

All of our work for this tutorial is managed under the Monitoring tab. The 5 steps we will be focusing on are –

i.            Database operations – operations that are most time consuming.

ii.            Web transactions – APDEX most dissatisfying.

iii.            Profiling JVM – CPU burn broken down by web requests.

iv.            External Services – Total Response time of external services.

v.            Transactions – Closely monitor ‘key’ web transactions with more precision.

Please note that I have selected only one of the many tuning parameters available on each of the tuning steps.  The last step is found under the Transactions stack.

Database Operations – operations that are most time consuming

Probably, the most important area of tuning a web application apart from the code itself is the database. Here we want to look at database operations (Select, Update, Insert, Delete) that are most time consuming. Figure 2 below shows that ‘SELECT’ queries against table ‘patient_detail’ are being made 45% of the time. When we combine this information with the response time and throughput graph on the right, we will be able to flag this. In this instance, the throughput is less than 2ms. So we’re good. Additionally, we can also examine what pages/resources (jsps, filters, interceptors, etc.) are making this database call.

Database_Operation_Most_Time_Consuming

Figure 2: Database Operations sorted by ‘Most time consuming’ filter

Web transactions – APDEX most dissatisfying transactions

APDEX or Application Performance Index takes into account averages of response times of each transaction and gives insight about user satisfaction. This is useful in determining what web transactions are taking exponentially longer than others and resulting in user dissatisfaction. Figure 3 shows that ‘/login’ needs to be looked into immediately as it is consuming 88% of the overall wall clock time. At the bottom right we can see ‘App server transaction traces’ that show two separate instances of request made to ‘/login’ took over 6.5 seconds.

Web_Transactions_Apdex_most_dissatisfying

Figure 3: APDEX ‘Most dissatisfying’ web transactions

Profiling JVM – CPU burn broken down by web requests

We can also profile the JVM to look at CPU burn broken down by web requests to view what requests are hogging the CPU. We can then look at that specific part of the code to further examine. Figure 4 displays a sample profile output. There isn’t request that is really hogging the CPU. So we’re good here.

Profile_JVM_CPU_burn

Figure 4: JVM Profiling for CPU burn filtered by Web Requests

External Services – Total Response time of external services

If we have any REST or WS* web service calls or remote messaging, we can view the response times of those external services to see if any of the calls are taking longer than our specified APDEX. To an end user these external services should feel like making a request to any other web transaction. Although our sample application does not make any external service calls, you can easily view these from the ‘External services’ sub tab under the ‘Monitoring’ tab.

Transactions – Closely monitor ‘key’ web transactions with more precision

The new ‘Transactions’ stack allows monitoring of the most important assets of the application. Under the hood this is similar to identifying slow response time for a web transaction. The added benefit of using this is we can view more detailed graph with all the resources associated with the transaction. For example, I’ve created a ‘Security Check’ transaction to monitor the authentication and authorization process of spring security framework.  In figure 5, we can see response times of different filters in the filter chain. Notice also the error rate is very high at around 11:45am till noon. We can view the application server’s log for that period of time to see what is going on.

Track_Key_Transactions

Figure 5: Key Transactions

Summary

All of the steps we took in improving our java application’s performance are only fraction of what we can do with New Relic. Also, the application could easily have been an asp.net application. We can also monitor the server stack in addition to the application stack to get a better picture of how our application(s) make use of the server resources such as I/O, RAM and CPU.

Snakes and Ladders in Java Swing

Overview

We all know what ‘Snakes and ladders’ game is all about. In this artice, I am going write a Java Swing based game for two players. Before I begin, in case my rules for the game are different, I want explain this first. If you want to quickly jump over to the solution click here.

Rules of the game

The game has multiple players where players take turns to roll dice.
If on any player’s turn the number on the dice is ‘1’ or ‘6’, the player’s token moves forward to that many places (1 or 6) and also gets to throw one more time.
To start the game itself, a player needs to roll 1 or 6. This moves the token to the start position on the board or 1. The player again gets to throw.
If a player’s token lands on the bottom of a ladder, the token moves to the top of the ladder (always greater than the current position).
Conversely, if the player’s token lands on snake’s mouth, then token moves to the tail of the snake (always less that the current position).
Whoever gets to the last number or greater wins. I know this logic is a bit off from the regular game where the player’s token needs to land on the exact ‘final’ number in order to win or the token just moves the remaining position backwards.

Technical Requirements

We need a main GUI where the board is visible and allows users to see where their tokens are.
Players need to be created and their current token position maintained.
Users also need to be able to click on a “Roll Dice” button.
Every “roll” needs to randomly generate values from 1 through 6 only.
The tokens need to move to the correct position on the grid/board.
When a player’s token reaches the final number in the board, a message should be printed indicating which player won and the game should then stop.
Users should be able to start the game by clicking the top menu on “File -> New game” .

Solution

Create a new Swing Application and add a FrameView. I called it SnakesAndLadderView. The snippet below shows the initizalization of the Swing application. Notice the class variables Player: Player1 and Player: Player2. I will come to this later. This takes care of our first requirement.

package snakesandladder;
import java.awt.Color;
import java.awt.Graphics;
import org.jdesktop.application.Action;
import org.jdesktop.application.ResourceMap;
import org.jdesktop.application.SingleFrameApplication;
import org.jdesktop.application.FrameView;
import org.jdesktop.application.TaskMonitor;
import java.awt.event.ActionEvent;
import java.awt.event.ActionListener;
import java.awt.image.BufferedImage;
import java.io.File;
import javax.imageio.ImageIO;
import javax.swing.Timer;
import javax.swing.Icon;
import javax.swing.ImageIcon;
import javax.swing.JDialog;
import javax.swing.JFrame;
import snakesandladder.domain.Player;
/**
* The application's main frame.
*/
public class SnakesAndLadderView extends FrameView {
private Player currentPlayer;
Player player1 = new Player("red", "Player1");
Player player2 = new Player("yellow", "Player2");
boolean canRollAgain;
private javax.swing.JButton btnRoll;
private javax.swing.JLabel lblDiceValue;
private javax.swing.JLabel lblMain;
private javax.swing.JLabel lblPlayer1;
private javax.swing.JLabel lblPlayer2;
private javax.swing.JPanel mainPanel;
private javax.swing.JMenuBar menuBar;
private javax.swing.JMenuItem newGameMenuItem;
private javax.swing.JPanel pnlGame;
private javax.swing.JLabel statusAnimationLabel;
private javax.swing.JLabel statusMessageLabel;
private javax.swing.JPanel statusPanel;
private javax.swing.JTextField txtStatus;
// End of variables declaration
private final Timer messageTimer;
private final Timer busyIconTimer;
private final Icon idleIcon;
private final Icon[] busyIcons = new Icon[15];
private int busyIconIndex = 0;
private JDialog aboutBox;
/**
* @return the currentPlayer
*/
public Player getCurrentPlayer() {
return currentPlayer;
}
/**
* @param currentPlayer the currentPlayer to set
*/
public void setCurrentPlayer(Player currentPlayer) {
this.currentPlayer = currentPlayer;
}
public SnakesAndLadderView(SingleFrameApplication app) {
super(app);
initComponents();
this.pnlGame.setVisible(false);
this.btnRoll.setVisible(false);
this.txtStatus.setVisible(false);
this.lblPlayer1.setVisible(false);
this.lblPlayer2.setVisible(false);

// status bar initialization - message timeout, idle icon and busy animation, etc
ResourceMap resourceMap = getResourceMap();
int messageTimeout = resourceMap.getInteger("StatusBar.messageTimeout");
messageTimer = new Timer(messageTimeout, new ActionListener() {
public void actionPerformed(ActionEvent e) {
statusMessageLabel.setText("");
}
});
messageTimer.setRepeats(false);
int busyAnimationRate = resourceMap.getInteger("StatusBar.busyAnimationRate");
for (int i = 0; i < busyIcons.length; i++) {
busyIcons[i] = resourceMap.getIcon("StatusBar.busyIcons[" + i + "]");
}
busyIconTimer = new Timer(busyAnimationRate, new ActionListener() {
public void actionPerformed(ActionEvent e) {
busyIconIndex = (busyIconIndex + 1) % busyIcons.length;
statusAnimationLabel.setIcon(busyIcons[busyIconIndex]);
}
});
idleIcon = resourceMap.getIcon("StatusBar.idleIcon");
statusAnimationLabel.setIcon(idleIcon);
// progressBar.setVisible(false);
// connecting action tasks to status bar via TaskMonitor
TaskMonitor taskMonitor = new TaskMonitor(getApplication().getContext());
taskMonitor.addPropertyChangeListener(new java.beans.PropertyChangeListener() {
public void propertyChange(java.beans.PropertyChangeEvent evt) {
String propertyName = evt.getPropertyName();
if ("started".equals(propertyName)) {
if (!busyIconTimer.isRunning()) {
statusAnimationLabel.setIcon(busyIcons[0]);
busyIconIndex = 0;
busyIconTimer.start();
}
// progressBar.setVisible(true);
// progressBar.setIndeterminate(true);
} else if ("done".equals(propertyName)) {
busyIconTimer.stop();
statusAnimationLabel.setIcon(idleIcon);
//progressBar.setVisible(false);
// progressBar.setValue(0);
} else if ("message".equals(propertyName)) {
String text = (String) (evt.getNewValue());
statusMessageLabel.setText((text == null) ? "" : text);
messageTimer.restart();
} else if ("progress".equals(propertyName)) {
int value = (Integer) (evt.getNewValue());
// progressBar.setVisible(true);
// progressBar.setIndeterminate(false);
// progressBar.setValue(value);
}
}
});

}
@Action
public void showAboutBox() {
if (aboutBox == null) {
JFrame mainFrame = SnakesAndLadderApp.getApplication().getMainFrame();
aboutBox = new SnakesAndLadderAboutBox(mainFrame);
aboutBox.setLocationRelativeTo(mainFrame);
}
SnakesAndLadderApp.getApplication().show(aboutBox);
}
/** This method is called from within the constructor to
* initialize the form.
* WARNING: Do NOT modify this code. The content of this method is
* always regenerated by the Form Editor.
*/
@SuppressWarnings("unchecked")
// <editor-fold defaultstate="collapsed" desc="Generated Code">
private void initComponents() {
mainPanel = new javax.swing.JPanel();
pnlGame = new javax.swing.JPanel();
lblMain = new javax.swing.JLabel();
menuBar = new javax.swing.JMenuBar();
javax.swing.JMenu fileMenu = new javax.swing.JMenu();
newGameMenuItem = new javax.swing.JMenuItem();
javax.swing.JMenuItem exitMenuItem = new javax.swing.JMenuItem();
javax.swing.JMenu helpMenu = new javax.swing.JMenu();
javax.swing.JMenuItem aboutMenuItem = new javax.swing.JMenuItem();
statusPanel = new javax.swing.JPanel();
javax.swing.JSeparator statusPanelSeparator = new javax.swing.JSeparator();
statusMessageLabel = new javax.swing.JLabel();
statusAnimationLabel = new javax.swing.JLabel();
txtStatus = new javax.swing.JTextField();
btnRoll = new javax.swing.JButton();
lblPlayer1 = new javax.swing.JLabel();
lblPlayer2 = new javax.swing.JLabel();
lblDiceValue = new javax.swing.JLabel();
mainPanel.setMaximumSize(new java.awt.Dimension(583, 560));
mainPanel.setMinimumSize(new java.awt.Dimension(583, 560));
mainPanel.setName("mainPanel"); // NOI18N
pnlGame.setMaximumSize(new java.awt.Dimension(583, 560));
pnlGame.setName("pnlGame"); // NOI18N
org.jdesktop.application.ResourceMap resourceMap = org.jdesktop.application.Application.getInstance(snakesandladder.SnakesAndLadderApp.class).getContext().getResourceMap(SnakesAndLadderView.class);
lblMain.setBackground(resourceMap.getColor("lblMain.background")); // NOI18N
lblMain.setIcon(resourceMap.getIcon("lblMain.icon")); // NOI18N
lblMain.setText(resourceMap.getString("lblMain.text")); // NOI18N
lblMain.setName("lblMain"); // NOI18N
javax.swing.GroupLayout pnlGameLayout = new javax.swing.GroupLayout(pnlGame);
pnlGame.setLayout(pnlGameLayout);
pnlGameLayout.setHorizontalGroup(
pnlGameLayout.createParallelGroup(javax.swing.GroupLayout.Alignment.LEADING)
.addGroup(pnlGameLayout.createSequentialGroup()
.addGap(27, 27, 27)
.addComponent(lblMain, javax.swing.GroupLayout.PREFERRED_SIZE, 506, javax.swing.GroupLayout.PREFERRED_SIZE)
.addContainerGap(30, Short.MAX_VALUE))
);
pnlGameLayout.setVerticalGroup(
pnlGameLayout.createParallelGroup(javax.swing.GroupLayout.Alignment.LEADING)
.addGroup(pnlGameLayout.createSequentialGroup()
.addComponent(lblMain, javax.swing.GroupLayout.DEFAULT_SIZE, 538, Short.MAX_VALUE)
.addContainerGap())
);
javax.swing.GroupLayout mainPanelLayout = new javax.swing.GroupLayout(mainPanel);
mainPanel.setLayout(mainPanelLayout);
mainPanelLayout.setHorizontalGroup(
mainPanelLayout.createParallelGroup(javax.swing.GroupLayout.Alignment.LEADING)
.addGroup(mainPanelLayout.createSequentialGroup()
.addContainerGap()
.addComponent(pnlGame, javax.swing.GroupLayout.PREFERRED_SIZE, javax.swing.GroupLayout.DEFAULT_SIZE, javax.swing.GroupLayout.PREFERRED_SIZE)
.addContainerGap(javax.swing.GroupLayout.DEFAULT_SIZE, Short.MAX_VALUE))
);
mainPanelLayout.setVerticalGroup(
mainPanelLayout.createParallelGroup(javax.swing.GroupLayout.Alignment.LEADING)
.addGroup(mainPanelLayout.createSequentialGroup()
.addComponent(pnlGame, javax.swing.GroupLayout.PREFERRED_SIZE, javax.swing.GroupLayout.DEFAULT_SIZE, javax.swing.GroupLayout.PREFERRED_SIZE)
.addContainerGap())
);
menuBar.setDoubleBuffered(true);
menuBar.setMaximumSize(new java.awt.Dimension(62, 21));
menuBar.setMinimumSize(new java.awt.Dimension(62, 21));
menuBar.setName("menuBar"); // NOI18N
fileMenu.setText(resourceMap.getString("fileMenu.text")); // NOI18N
fileMenu.setName("fileMenu"); // NOI18N
javax.swing.ActionMap actionMap = org.jdesktop.application.Application.getInstance(snakesandladder.SnakesAndLadderApp.class).getContext().getActionMap(SnakesAndLadderView.class, this);
newGameMenuItem.setAction(actionMap.get("startGame")); // NOI18N
newGameMenuItem.setText(resourceMap.getString("newGameMenuItem.text")); // NOI18N
newGameMenuItem.setName("newGameMenuItem"); // NOI18N
fileMenu.add(newGameMenuItem);
exitMenuItem.setAction(actionMap.get("quit")); // NOI18N
exitMenuItem.setName("exitMenuItem"); // NOI18N
fileMenu.add(exitMenuItem);
menuBar.add(fileMenu);
helpMenu.setText(resourceMap.getString("helpMenu.text")); // NOI18N
helpMenu.setName("helpMenu"); // NOI18N
aboutMenuItem.setAction(actionMap.get("showAboutBox")); // NOI18N
aboutMenuItem.setName("aboutMenuItem"); // NOI18N
helpMenu.add(aboutMenuItem);
menuBar.add(helpMenu);
statusPanel.setMaximumSize(new java.awt.Dimension(583, 82));
statusPanel.setMinimumSize(new java.awt.Dimension(583, 82));
statusPanel.setName("statusPanel"); // NOI18N
statusPanelSeparator.setName("statusPanelSeparator"); // NOI18N
statusMessageLabel.setName("statusMessageLabel"); // NOI18N
statusAnimationLabel.setHorizontalAlignment(javax.swing.SwingConstants.LEFT);
statusAnimationLabel.setName("statusAnimationLabel"); // NOI18N
txtStatus.setText(resourceMap.getString("txtStatus.text")); // NOI18N
txtStatus.setName("txtStatus"); // NOI18N
btnRoll.setText(resourceMap.getString("btnRoll.text")); // NOI18N
btnRoll.setName("btnRoll"); // NOI18N
btnRoll.addActionListener(new java.awt.event.ActionListener() {
public void actionPerformed(java.awt.event.ActionEvent evt) {
btnRollActionPerformed(evt);
}
});
lblPlayer1.setIcon(resourceMap.getIcon("lblPlayer1.icon")); // NOI18N
lblPlayer1.setText(resourceMap.getString("lblPlayer1.text")); // NOI18N
lblPlayer1.setName("lblPlayer1"); // NOI18N
lblPlayer2.setIcon(resourceMap.getIcon("lblPlayer2.icon")); // NOI18N
lblPlayer2.setText(resourceMap.getString("lblPlayer2.text")); // NOI18N
lblPlayer2.setName("lblPlayer2"); // NOI18N
lblDiceValue.setText(resourceMap.getString("lblDiceValue.text")); // NOI18N
lblDiceValue.setName("lblDiceValue"); // NOI18N
javax.swing.GroupLayout statusPanelLayout = new javax.swing.GroupLayout(statusPanel);
statusPanel.setLayout(statusPanelLayout);
statusPanelLayout.setHorizontalGroup(
statusPanelLayout.createParallelGroup(javax.swing.GroupLayout.Alignment.LEADING)
.addGroup(statusPanelLayout.createSequentialGroup()
.addContainerGap()
.addGroup(statusPanelLayout.createParallelGroup(javax.swing.GroupLayout.Alignment.LEADING)
.addComponent(statusMessageLabel)
.addGroup(statusPanelLayout.createSequentialGroup()
.addComponent(txtStatus, javax.swing.GroupLayout.PREFERRED_SIZE, 178, javax.swing.GroupLayout.PREFERRED_SIZE)
.addGap(18, 18, 18)
.addComponent(lblDiceValue, javax.swing.GroupLayout.PREFERRED_SIZE, 157, javax.swing.GroupLayout.PREFERRED_SIZE)
.addGap(18, 18, 18)
.addGroup(statusPanelLayout.createParallelGroup(javax.swing.GroupLayout.Alignment.LEADING)
.addComponent(lblPlayer1)
.addComponent(lblPlayer2))
.addGroup(statusPanelLayout.createParallelGroup(javax.swing.GroupLayout.Alignment.LEADING)
.addGroup(statusPanelLayout.createSequentialGroup()
.addGap(122, 122, 122)
.addGroup(statusPanelLayout.createParallelGroup(javax.swing.GroupLayout.Alignment.LEADING)
.addComponent(statusPanelSeparator, javax.swing.GroupLayout.DEFAULT_SIZE, 24, Short.MAX_VALUE)
.addGroup(javax.swing.GroupLayout.Alignment.TRAILING, statusPanelLayout.createSequentialGroup()
.addComponent(statusAnimationLabel)
.addContainerGap())))
.addGroup(statusPanelLayout.createSequentialGroup()
.addGap(18, 18, 18)
.addComponent(btnRoll, javax.swing.GroupLayout.PREFERRED_SIZE, 73, javax.swing.GroupLayout.PREFERRED_SIZE)
.addContainerGap())))))
);
statusPanelLayout.setVerticalGroup(
statusPanelLayout.createParallelGroup(javax.swing.GroupLayout.Alignment.LEADING)
.addGroup(statusPanelLayout.createSequentialGroup()
.addGroup(statusPanelLayout.createParallelGroup(javax.swing.GroupLayout.Alignment.LEADING)
.addGroup(statusPanelLayout.createSequentialGroup()
.addComponent(statusPanelSeparator, javax.swing.GroupLayout.PREFERRED_SIZE, 2, javax.swing.GroupLayout.PREFERRED_SIZE)
.addPreferredGap(javax.swing.LayoutStyle.ComponentPlacement.UNRELATED)
.addGroup(statusPanelLayout.createParallelGroup(javax.swing.GroupLayout.Alignment.BASELINE)
.addComponent(lblPlayer1)
.addComponent(btnRoll)))
.addGroup(statusPanelLayout.createSequentialGroup()
.addGap(16, 16, 16)
.addGroup(statusPanelLayout.createParallelGroup(javax.swing.GroupLayout.Alignment.BASELINE)
.addComponent(txtStatus, javax.swing.GroupLayout.PREFERRED_SIZE, javax.swing.GroupLayout.DEFAULT_SIZE, javax.swing.GroupLayout.PREFERRED_SIZE)
.addComponent(lblDiceValue))))
.addPreferredGap(javax.swing.LayoutStyle.ComponentPlacement.RELATED)
.addGroup(statusPanelLayout.createParallelGroup(javax.swing.GroupLayout.Alignment.LEADING)
.addGroup(statusPanelLayout.createSequentialGroup()
.addPreferredGap(javax.swing.LayoutStyle.ComponentPlacement.RELATED, 18, Short.MAX_VALUE)
.addGroup(statusPanelLayout.createParallelGroup(javax.swing.GroupLayout.Alignment.BASELINE)
.addComponent(statusMessageLabel)
.addComponent(statusAnimationLabel))
.addGap(22, 22, 22))
.addGroup(statusPanelLayout.createSequentialGroup()
.addComponent(lblPlayer2)
.addContainerGap())))
);
setComponent(mainPanel);
setMenuBar(menuBar);
setStatusBar(statusPanel);
}

Now to take care of rest of the logic. Notice that I have used x and y co-ordinates to move the player's tokens. "changeActualPosition()" passes an int value and the co-ordinates based on the board's geometry is returned. I simply created two buffered images of ovals with colors 'yellow' and 'red' with size 30px by 30 px. The "rollAgain()" method generates a random double between 1 and 6 and is converted into int. We really want to lose the precision in this case. When the player wins, the "canRollAgain" class level boolean is set to false and the status message displays "Player x" wins the games.

private void btnRollActionPerformed(java.awt.event.ActionEvent evt) {
// TODO add your handling code here:

double l = Math.ceil(Math.random() * 6);
boolean status = getCurrentPlayer().isStatus();
this.lblDiceValue.setText("dice rolles out number.." + (int) l);
if (l == 1 || l == 6) {
canRollAgain = true;
}
//when status is false
if (!status) {
//Not 1 or 6
if ((l < 6) && (l > 1)) {
if (currentPlayer.getName().equals("Player1")) {
this.txtStatus.setText("Player 2's turn to roll the dice!");
this.setCurrentPlayer(player2);
} else {
this.txtStatus.setText("Player 1's turn to roll the dice!");
this.setCurrentPlayer(player1);
}
} else {
if (currentPlayer.getName().equals("Player1")) {
this.player1.setStatus(true);
this.txtStatus.setText("Player " + this.currentPlayer.getName() + "'s turn to roll the dice again!");
} else {
this.player2.setStatus(true);
this.txtStatus.setText("Player " + this.currentPlayer.getName() + "'s turn to roll the dice again!");
}
canRollAgain = false;
}
//when status is true
} else {
if (canRollAgain){
this.move(l);
this.txtStatus.setText("Player " + this.currentPlayer.getName() + "'s turn to roll the dice again!");
canRollAgain = false;
}else{
this.move(l);
if (currentPlayer.getName().equals("Player1")) {
this.txtStatus.setText("Player 2's turn to roll the dice!");
this.setCurrentPlayer(player2);
} else {
this.txtStatus.setText("Player 1's turn to roll the dice!");
this.setCurrentPlayer(player1);
}
}
}
}
@Action
public void startGame() {
txtStatus.setEditable(false);
this.pnlGame.setVisible(true);
this.btnRoll.setVisible(true);
this.txtStatus.setVisible(true);
this.lblPlayer1.setVisible(true);
this.lblPlayer2.setVisible(true);
this.setCurrentPlayer(player1);
this.txtStatus.setText("Player 1's turn to roll the dice");
}
// Variables declaration - do not modify
private javax.swing.JButton btnRoll;
private javax.swing.JLabel lblDiceValue;
private javax.swing.JLabel lblMain;
private javax.swing.JLabel lblPlayer1;
private javax.swing.JLabel lblPlayer2;
private javax.swing.JPanel mainPanel;
private javax.swing.JMenuBar menuBar;
private javax.swing.JMenuItem newGameMenuItem;
private javax.swing.JPanel pnlGame;
private javax.swing.JLabel statusAnimationLabel;
private javax.swing.JLabel statusMessageLabel;
private javax.swing.JPanel statusPanel;
private javax.swing.JTextField txtStatus;
// End of variables declaration
private final Timer messageTimer;
private final Timer busyIconTimer;
private final Icon idleIcon;
private final Icon[] busyIcons = new Icon[15];
private int busyIconIndex = 0;
private JDialog aboutBox;
/**
* @return the currentPlayer
*/
public Player getCurrentPlayer() {
return currentPlayer;
}
/**
* @param currentPlayer the currentPlayer to set
*/
public void setCurrentPlayer(Player currentPlayer) {
this.currentPlayer = currentPlayer;
}
private void move(double l) {
currentPlayer.setPosition(currentPlayer.getPosition() + (int) l);
changeActualPostion();
if (currentPlayer.getPosition()>=64){
this.txtStatus.setText(this.currentPlayer.getName() + " wins!!!!");
this.btnRoll.setEnabled(false);
}
try {
BufferedImage image = ImageIO.read(new File("lib/board.gif"));
Graphics g = image.getGraphics();
int transparency = 90;
Color color =new Color(255, 0, 0, 255 * transparency / 100);
int x = getX(player1.getPosition());
int y = getY(player1.getPosition());
g.setColor(color);
g.fillOval(x, y, 30, 30);

int x2 = getX(player2.getPosition());
int y2 = getY(player2.getPosition());
color = new Color(255, 255, 0, 255 * transparency / 100);
g.setColor(color);
g.fillOval(x2, y2, 30, 30);
ImageIcon icon = new ImageIcon(image);
icon.getImage().flush();
lblMain.setIcon(icon);
//ImageIO.write(image, "jpg", new File("d:\\temp\\output.bmp"));

} catch (Exception e) {
System.out.println(e);
}
if (currentPlayer.getName().equals("Player1")) {
this.player1.setPosition(currentPlayer.getPosition());
} else {
this.player2.setPosition(currentPlayer.getPosition());
}

}

private void rollAgain() {
double l = Math.ceil(Math.random() * 6);
this.lblDiceValue.setText("Dice rolles out number......." + (int) l);
move(l);
}
private void changeActualPostion() {
switch (currentPlayer.getPosition()) {
case 3:
currentPlayer.setPosition(18);
break;
case 19:
currentPlayer.setPosition(5);
break;
case 24:
currentPlayer.setPosition(39);
break;
case 27:
currentPlayer.setPosition(8);
break;
case 29:
currentPlayer.setPosition(53);
break;
case 62:
currentPlayer.setPosition(32);
break;
case 58:
currentPlayer.setPosition(41);
break;
case 48:
currentPlayer.setPosition(63);
break;
}
}
private int getX(int pos) {
int x = 0;
switch (pos) {
case 1:
x = 20;
break;
case 2:
x = 82;
break;
case 3:
x = 82 + 62;
break;
case 4:
x = 82 + 62 + 62;
break;
case 5:
x = 82 + 62 + 62 + 62;
break;
case 6:
x = 82 + 62 + 62 + 62 + 62;
break;
case 7:
x = 82 + 62 + 62 + 62 + 62 + 62;
break;
case 8:
x = 82 + 62 + 62 + 62 + 62 + 62 + 62;
break;
case 9:
x = 82 + 62 + 62 + 62 + 62 + 62 + 62;
break;
case 10:
x = 82 + 62 + 62 + 62 + 62 + 62;
break;
case 11:
x = 82 + 62 + 62 + 62 + 62;
break;
case 12:
x = 82 + 62 + 62 + 62;
break;
case 13:
x = 82 + 62 + 62;
break;
case 14:
x = 82 + 62;
break;
case 15:
x = 82;
break;
case 16:
x = 20;
break;
case 17:
x = 20;
break;
case 18:
x = 82;
break;
case 19:
x = 82 + 62;
break;
case 20:
x = 82 + 62 + 62;
break;
case 21:
x = 82 + 62 + 62 + 62;
break;
case 22:
x = 82 + 62 + 62 + 62 + 62;
break;
case 23:
x = 82 + 62 + 62 + 62 + 62 + 62;
break;
case 24:
x = 82 + 62 + 62 + 62 + 62 + 62 + 62;
break;
case 25:
x = 82 + 62 + 62 + 62 + 62 + 62 + 62;
break;
case 26:
x = 82 + 62 + 62 + 62 + 62 + 62;
break;
case 27:
x = 82 + 62 + 62 + 62 + 62;
break;
case 28:
x = 82 + 62 + 62 + 62;
break;
case 29:
x = 82 + 62 + 62;
break;
case 30:
x = 82 + 62;
break;
case 31:
x = 82;
break;
case 32:
x = 20;
break;
case 33:
x = 20;
break;
case 34:
x = 82;
break;
case 35:
x = 82 + 62;
break;
case 36:
x = 82 + 62 + 62;
break;
case 37:
x = 82 + 62 + 62 + 62;
break;
case 38:
x = 82 + 62 + 62 + 62 + 62;
break;
case 39:
x = 82 + 62 + 62 + 62 + 62 + 62;
break;
case 40:
x = 82 + 62 + 62 + 62 + 62 + 62 + 62;
break;
case 41:
x = 82 + 62 + 62 + 62 + 62 + 62 + 62;
break;
case 42:
x = 82 + 62 + 62 + 62 + 62 + 62;
break;
case 43:
x = 82 + 62 + 62 + 62 + 62;
break;
case 44:
x = 82 + 62 + 62 + 62;
break;
case 45:
x = 82 + 62 + 62;
break;
case 46:
x = 82 + 62;
break;
case 47:
x = 82;
break;
case 48:
x = 20;
break;
case 49:
x = 20;
break;
case 50:
x = 82;
break;
case 51:
x = 82 + 62;
break;
case 52:
x = 82 + 62 + 62;
break;
case 53:
x = 82 + 62 + 62 + 62;
break;
case 54:
x = 82 + 62 + 62 + 62 + 62;
break;
case 55:
x = 82 + 62 + 62 + 62 + 62 + 62;
break;
case 56:
x = 82 + 62 + 62 + 62 + 62 + 62 + 62;
break;
case 57:
x = 82 + 62 + 62 + 62 + 62 + 62 + 62;
break;
case 58:
x = 82 + 62 + 62 + 62 + 62 + 62;
break;
case 59:
x = 82 + 62 + 62 + 62 + 62;
break;
case 60:
x = 82 + 62 + 62 + 62;
break;
case 61:
x = 82 + 62 + 62;
break;
case 62:
x = 82 + 62;
break;
case 63:
x = 82;
break;
case 64:
x = 20;
break;
}
return x;
}
private int getY(int pos) {
int y = 0;
if (pos > 0 && pos < 9) {
y = 60 + 62 + 62 + 62 + 62 + 62 + 62 + 62;
}
if (pos > 8 && pos < 17) {
y = 60 + 62 + 62 + 62 + 62 + 62 + 62;
}
if (pos > 16 && pos < 25) {
y = 60 + 62 + 62 + 62 + 62 + 62;
}
if (pos > 24 && pos < 33) {
y = 60 + 62 + 62 + 62 + 62;
}
if (pos > 32 && pos < 41) {
y = 60 + 62 + 62 + 62;
}
if (pos > 40 && pos < 49) {
y = 60 + 62 + 62;
}
if (pos > 48 && pos < 57) {
y = 60 + 62;
}
if (pos > 56) {
y = 60;
}
return y;
}

Finally the missing piece is the Player domain itself. We need to maintain the status, position, name and icon. Status is basically “turn”. Position is the token’s position. Icon is basically what color – “yellow” or “red”.

package snakesandladder.domain;
/**
*
* @author tesnep
*/
public class Player {
private boolean status;
private String icon;
private String name;
private int position;
public Player(String icon, String name){
setPosition(0);
setStatus(false);
setIcon(icon);
setName(name);
}
/**
* @return the status
*/
public boolean isStatus() {
return status;
}
/**
* @param status the status to set
*/
public void setStatus(boolean status) {
this.status = status;
}
/**
* @return the icon
*/
public String getIcon() {
return icon;
}
/**
* @param icon the icon to set
*/
public void setIcon(String icon) {
this.icon = icon;
}
/**
* @return the name
*/
public String getName() {
return name;
}
/**
* @param name the name to set
*/
public void setName(String name) {
this.name = name;
}
/**
* @return the position
*/
public int getPosition() {
return position;
}
/**
* @param position the position to set
*/
public void setPosition(int position) {
this.position = position;
}
}

When you run, you may need to resize the GUI. Please also note that I did not show all the IDE generated GUI code as that would make it too long to read.

FYI: http://forum.codecall.net/topic/71330-java-swing-game-snakes-ladders/#axzz294rcg3MR

This is the same contribution I made to CodeCall.NET